You MUST know how to use Layer Masks to use this tutorial!
This tutorial will teach how to extract using a Layer Mask and PEN TOOL.  (Which is found on your long vertical toolbar.)
First, choose a scan. Duplicate the layer again. We do this because you are unable to create layers masks on the original background layer.
Now here’s a personal trick I’ve developed. Some tutorials teach to remove all the backgrounds by sectioning out and filling with black. I do the opposite. Fill the entire layer mask BLACK with the bucket (fill) tool.
Here’s what I did so far: CLICK TO VIEW SCREENSHOT
If you still have the bottom (original) layer opened, you will see no change. If you click the eye on the palette of the bottom layer however, you will see that the top layer is completely gone. (As predicted, since black = disappear and white = appear.)
Remove the EYE in the palette and you see its transparency: CLICK TO VIEW SCREENSHOT
Click the eye so that it comes BACK and we can see the bottom layer. We need it for reference after all…
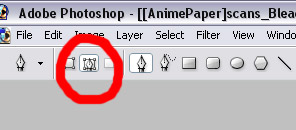
Now click the PEN TOOL  (Which is found on your long vertical toolbar.) and be sure the top of your toolbar options has the same active option image shown below. This allows us to use the pen tool to plot points.

Make your foreground color palette WHITE. Remember we are making the missing character come back now.
You don’t have to be fantastic as using the pen tool to extract. As you learn to use the pen tool to do other things, you will find it has many functions and can create a lot of shapes, but for now, we’re just going to zoom in about a billion times (or whatever works for you) and start outlining the character. Trace the entire OUTSIDE of the character and don’t worry about small strands of hair and whatnot within the trace.
Here’s what I did so far: CLICK TO VIEW SCREENSHOT
As you are nearing the end and have fully traced the outside of the character, you will find that as you connect the last point to the first point, a small circle will appear next to your pen tool cursor. That’s just signifying that it’s about to close. Congrats! You’re almost done. Now that the entire character is outlined and the pen tool still active, within the outline Right Click and choose the option FILL PATH… A box will pop up and just be sure the foreground color is white and choose Foreground Color, Opacity 100, Feather Radius: 0 and Anti-Aliased box checked.
Here’s what I did so far: CLICK TO VIEW SCREENSHOT
Your character is back in the top layer at this point. Right Click and Delete Path to remove the outline. So click the eye off on the bottom layer to see the desired result. (If you want to be sure no white spots remain, create a filled layer of neon green or something underneath the extracted layer.) Sure it’s tedious and isn’t fun, but extracting is one of the most important parts of creating graphics. If you can’t find a ready-made PNG out there and need to extract yourself, this is the way to go.
Here’s what I did so far: CLICK TO VIEW SCREENSHOT
NOTE: If you have background space in between an arm or hair or whatever, just trace around it and fill it BLACK to make it go away. (Duh?)
Alright, now here are your choices. You can keep the layer mask on this layer of the scan and drag it to use on your graphics as it is, HOWEVER note that the extra layer mask on it holds a lot of memory so your Photoshop may work kind of slow and saving layered works in a PSD file with a layer mask in it can cause it to take longer to load/save. (Obviously the more layer masks, the longer it is.) OR before actually using this extracted scan, Right Click the Layer Mask on the Layer Palette and click APPLY LAYER MASK. Bam, now any change on the layer mask is a part of the duplicated scan. It’s now fully extracted without any leftover residue of the former background. (Once again, if you have the background eye on, you will see it, so turn it OFF…)
Drag and drop and drop, resize your image to use, flatten the layers with the background not visible and whatnot. Do as you wish. Save the top layer (with the bottom layer’s eyes OFF.) as a PNG and there you go. Wasn’t that fun? (NOT…)


January 5, 2013
Which one is better for extracting scan images Photoshop or Illustrator?
January 5, 2013
Photoshop. Always Photoshop… I don’t even know how you could extract in Illustrator…